kubernetes と Vitess を使って MySQL クラスタを構築

概要
Vitess を使って MySQL クラスタを構築する
vitess
https://github.com/youtube/vitess/
事前準備
- プロジェクトの作成
- サービスアカウントキーの取得(JSON形式)
- gcloud 認証済み
コンテナクラスタ作成
以前 作成した terraform のコードをベースに構築
■tf ファイル
provider.tf
provider "google" {
  credentials = "${file("account.json")}"
  project     = "${var.project}"
  region      = "${var.region}"
}
container_cluster.tf
resource "google_container_cluster" "default" {
  name = "${var.cluster_name}"
  zone = "${var.zone}"
  network = "${var.network}"
  initial_node_count = "${var.initial_node_count}"

  node_config {
    machine_type = "${var.machine_type}"
    disk_size_gb = "${var.disk_size}"
    oauth_scopes = [
      "https://www.googleapis.com/auth/devstorage.read_write"
    ]
  }

  master_auth {
    username = "${var.master_auth_username}"
    password = "${var.master_auth_password}"
  }
}
storage_bucket.tf
resource "google_storage_bucket" "image-store" {
  name = "${var.project}-backup-bucket"
  location = "${var.location}"
}
variables.tf
variable "project" {}
variable "location" {
  default = "ASIA"
}
variable "region" {
  default = "asia-east1"
}
variable "cluster_name" {}
variable "zone" {}
variable "network" {}
variable "initial_node_count" {}
variable "machine_type" {}
variable "disk_size" {}
variable "master_auth_username" {}
variable "master_auth_password" {}
■terraform.tfvars
terraform.tfvars
## project
project = "**********"

## cluster config
cluster_name = "vitess-cluster"
zone = "asia-east1-b"
network = "default"
initial_node_count = "4"

## node config
machine_type = "n1-standard-2"
disk_size = "10"

## master auth
master_auth_username = "**********"
master_auth_password = "**********"
- 構築内容
- cluster名 : vitess-cluster (asia-east1-b)
- node数 : 4台 (n1-standard-2) ※これ以下のスペックだと無理
- node に対して、ストレージへの read/write 権限を付与
- Bucket名 : [プロジェクト名]-backup-bucket で作成(ASIA)
クラスタ作成
$ terraform apply
その他初期設定
$ gcloud config set project [プロジェクト名]
$ gcloud config set compute/zone asia-east1-b
$ gcloud config set container/cluster vitess-cluster
$ gcloud container clusters get-credentials vitess-cluster
Kubernetes 上で Vitess 環境を構築
vtctlclient のインストール
$ export GOPATH=`pwd`
$ go get github.com/youtube/vitess/go/cmd/vtctlclient
$ cp $GOPATH/bin/vtctlclient ~/bin/
Vitess 初期設定
$ cd $GOPATH/src/github.com/youtube/vitess/examples/kubernetes
$ ./condigure.sh
Backup Storage (file, gcs) [gcs]:
Google Developers Console Project [プロジェクト名]:
Google Cloud Storage bucket for Vitess backups: [プロジェクト名]-backup-bucket
Saving config.sh...
etcd クラスタ構築
etcd 起動前に外部からアクセスできるようにサービス用テンプレートを編集 (これしないと外部から WEB UI(vtctld) にアクセスした際に Topology Browser が参照できない )
./etcd-service-template.yaml
 spec:
+  type: LoadBalancer
   ports:
     - port: 4001
etcd 起動
$ ./etcd-up.sh
Creating etcd service for global cell...
service "etcd-global" created
service "etcd-global-srv" created
Creating etcd replicationcontroller for global cell...
replicationcontroller "etcd-global" created
Creating etcd service for test cell...
service "etcd-test" created
service "etcd-test-srv" created
Creating etcd replicationcontroller for test cell...
replicationcontroller "etcd-test" created
サービスの状態確認
$ kubectl get svc
NAME              CLUSTER_IP      EXTERNAL_IP       PORT(S)               SELECTOR                                AGE
etcd-global       10.31.247.111   ***.***.***.***   4001/TCP              app=vitess,cell=global,component=etcd   2m
etcd-global-srv   None            <none>            7001/TCP              app=vitess,cell=global,component=etcd   2m
etcd-test         10.31.244.184   ***.***.***.***   4001/TCP              app=vitess,cell=test,component=etcd     2m
etcd-test-srv     None            <none>            7001/TCP              app=vitess,cell=test,component=etcd     2m
vtctld の起動
外部からアクセスできるようにサービス用テンプレートを編集
./vtctld-service.yaml
 spec:
+  type: LoadBalancer
   ports:
     - name: web
vtctld 起動
$ ./vtctld-up.sh
Creating vtctld service...
service "vtctld" created
Creating vtctld replicationcontroller...
replicationcontroller "vtctld" created

To access vtctld web UI, start kubectl proxy in another terminal:
  kubectl proxy --port=8001
Then visit http://localhost:8001/api/v1/proxy/namespaces/default/services/vtctld:web/
サービスの状態確認
$ kubectl get svc
NAME              CLUSTER_IP      EXTERNAL_IP      PORT(S)               SELECTOR                                AGE
vtctld            10.55.250.136   ***.***.***.***  15000/TCP,15999/TCP   app=vitess,component=vtctld             1m
以下のアドレスにて WEB UI にアクセス可能
http://[ EXTERNAL_IP ]:15000/api/v1/proxy/namespaces/default/services/vtctld:web/
vttablet, MySQL Pod の作成
デフォルトのパラメータではリソース不足でエラーになるため修正
./vttablet-pod-template.yaml
@@ -30,8 +30,8 @@
       resources:
         limits:
-          memory: "1Gi"
-          cpu: "500m"
+          memory: "512Mi"
+          cpu: "100m"

@@ -88,8 +88,8 @@
       resources:
         limits:
-          memory: "1Gi"
-          cpu: "500m"
+          memory: "512Mi"
+          cpu: "100m"
pod, keyspace 作成
$ ./vttablet-up.sh
Creating test_keyspace.shard-0 pods in cell ...
Creating pod for tablet test-0000000100...
pod "vttablet-100" created
Creating pod for tablet test-0000000101...
pod "vttablet-101" created
Creating pod for tablet test-0000000102...
pod "vttablet-102" created
Creating pod for tablet test-0000000103...
pod "vttablet-103" created
Creating pod for tablet test-0000000104...
pod "vttablet-104" created

$ kubectl get pod
NAME                READY     STATUS    RESTARTS   AGE
vttablet-100        2/2       Running   1          1m
vttablet-101        2/2       Running   1          1m
vttablet-102        2/2       Running   0          1m
vttablet-103        2/2       Running   0          1m
vttablet-104        2/2       Running   0          1m
MySQL 初期化
$ ./kvtctl.sh RebuildKeyspaceGraph test_keyspace
Starting port forwarding to vtctld...

$ ./kvtctl.sh InitShardMaster -force test_keyspace/0 test-0000000100
Starting port forwarding to vtctld...
W1224 04:59:53.996276   20753 main.go:43] W1224 04:59:53.974546 logger.go:256] master-elect tablet est-0000000100 is not the shard master, proceeding anyway as -force was used
W1224 04:59:53.997008   20753 main.go:43] W1224 04:59:53.975036 logger.go:256] master-elect tablet est-0000000100 is not a master in the shard, proceeding anyway as -force was used

$ ./kvtctl.sh ListAllTablets test
Starting port forwarding to vtctld...
test-0000000100 test_keyspace 0 master 10.28.2.10:15002 10.28.2.10:3306 []
test-0000000101 test_keyspace 0 replica 10.28.1.9:15002 10.28.1.9:3306 []
test-0000000102 test_keyspace 0 replica 10.28.0.8:15002 10.28.0.8:3306 []
test-0000000103 test_keyspace 0 rdonly 10.28.3.6:15002 10.28.3.6:3306 []
test-0000000104 test_keyspace 0 rdonly 10.28.3.7:15002 10.28.3.7:3306 []
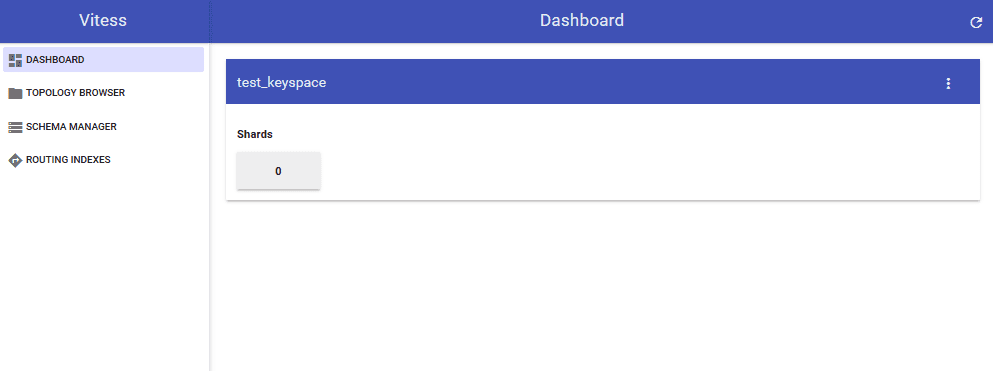
WEB UI から Shard Status 確認

テーブル作成
$ ./kvtctl.sh ApplySchema -sql "$(cat create_test_table.sql)" test_keyspace
作成したスキーマの確認
$ ./kvtctl.sh GetSchema test-0000000100
Starting port forwarding to vtctld...
{
  "database_schema": "CREATE DATABASE /*!32312 IF NOT EXISTS*/ `{{.DatabaseName}}` /*!40100 DEFAULT CHARACTER SET utf8 */",
  "table_definitions": [
    {
      "name": "messages",
      "schema": "CREATE TABLE `messages` (\n  `page` bigint(20) unsigned NOT NULL DEFAULT '0',\n  `time_created_ns` bigint(20) unsigned NOT NULL DEFAULT '0',\n  `keyspace_id` bigint(20) unsigned DEFAULT NULL,\n  `message` varchar(10000) DEFAULT NULL,\n  PRIMARY KEY (`page`,`time_created_ns`)\n) ENGINE=InnoDB DEFAULT CHARSET=utf8",
      "columns": [
        "page",
        "time_created_ns",
        "keyspace_id",
        "message"
      ],
      "primary_key_columns": [
        "page",
        "time_created_ns"
      ],
      "type": "BASE TABLE",
      "data_length": 16384,
      "row_count": 3
    }
  ],
  "version": "6428d6f8bc7250889e9b57c878333211"
}
vtctl で取得する場合は以下
$ vtctlclient -server [vtctld の EXTERNAL_IP]:15999 GetSchema test-0000000100
vtgate 起動
$ ./vtgate-up.sh
Creating vtgate service...
service "vtgate" created
Creating vtgate replicationcontroller...
replicationcontroller "vtgate" created

$ kubectl get svc
NAME              CLUSTER_IP      EXTERNAL_IP       PORT(S)               SELECTOR                                AGE
vtgate            10.31.252.42    ***.***.***.***   15001/TCP             app=vitess,component=vtgate             2m
サンプルアプリ実行
guestbook 起動
$ ./guestbook-up.sh
Creating guestbook service...
service "guestbook" created
Creating guestbook replicationcontroller...
replicationcontroller "guestbook" created

$ kubectl get svc
NAME              CLUSTER_IP      EXTERNAL_IP       PORT(S)               SELECTOR                                AGE
guestbook         10.31.250.204   ***.***.***.***   80/TCP                app=guestbook,component=frontend        2m
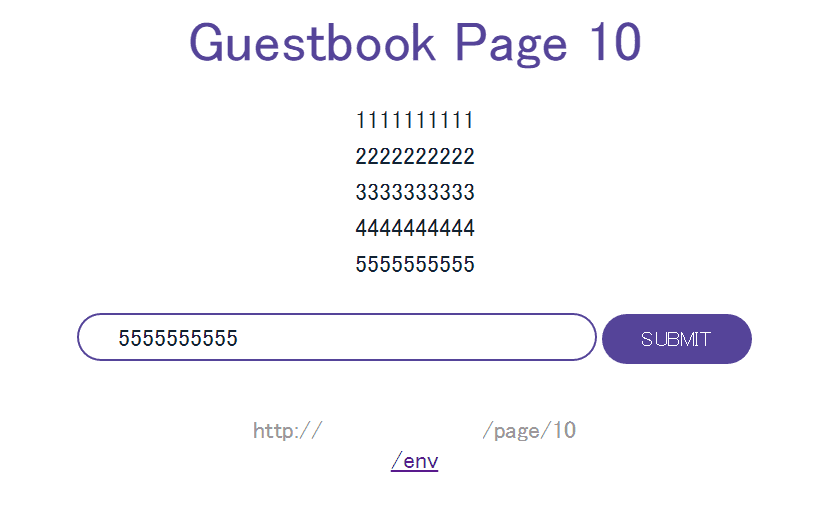
http://[ EXTERNAL_IP ]/ にアクセス

random page. のリンクより適当に入力
vtctl より確認
$ vtctlclient -server [vtctld EXTERNAL_IP]:15999 VtGateExecuteShards -server [vtgate EXTERNAL_IP]:15001 -keyspace test_keyspace -shards 0 -tablet_type rdonly "show tables"
{
  "Fields": [
    {
      "name": "Tables_in_vt_test_keyspace",
      "type": 6165
    }
  ],
  "RowsAffected": 1,
  "InsertID": 0,
  "Rows": [
    [
      "messages"
    ]
  ]
}


$ vtctlclient -server [vtctld EXTERNAL_IP]:15999 VtGateExecuteShards -server [vtgate EXTERNAL_IP]:15001 -keyspace test_keyspace -shards 0 -tablet_type rdonly "SELECT message FROM messages WHERE page=10 ORDER BY time_created_ns"
{
  "Fields": [
    {
      "name": "message",
      "type": 6165
    }
  ],
  "RowsAffected": 5,
  "InsertID": 0,
  "Rows": [
    [
      "1111111111"
    ],
    [
      "2222222222"
    ],
    [
      "3333333333"
    ],
    [
      "4444444444"
    ],
    [
      "5555555555"
    ]
  ]
}
master 切り替え
切り替え前
$ ./kvtctl.sh ListAllTablets test
test-0000000100 test_keyspace 0 master 10.28.3.6:15002 10.28.3.6:3306 []
test-0000000101 test_keyspace 0 spare 10.28.1.6:15002 10.28.1.6:3306 []
test-0000000102 test_keyspace 0 replica 10.28.2.5:15002 10.28.2.5:3306 []
test-0000000103 test_keyspace 0 rdonly 10.28.0.6:15002 10.28.0.6:3306 []
test-0000000104 test_keyspace 0 rdonly 10.28.3.7:15002 10.28.3.7:3306 []
切り替え
$ vtctlclient -server 130.211.252.96:15999 TabletExternallyReparented test-101
test-101 が master になる
$ ./kvtctl.sh ListAllTablets test
test-0000000100 test_keyspace 0 replica 10.28.3.6:15002 10.28.3.6:3306 []
test-0000000101 test_keyspace 0 master 10.28.1.6:15002 10.28.1.6:3306 []
test-0000000102 test_keyspace 0 replica 10.28.2.5:15002 10.28.2.5:3306 []
test-0000000103 test_keyspace 0 rdonly 10.28.0.6:15002 10.28.0.6:3306 []
test-0000000104 test_keyspace 0 rdonly 10.28.3.7:15002 10.28.3.7:3306 []
バックアップ
rdonly Pod に対して以下コマンド実行
$ ./kvtctl.sh Backup test-0000000104
terraform で作成した Bucket にアップロードされる

コマンドで確認
$ ./kvtctl.sh ListBackups test_keyspace/0
2015-12-24.051117.test-0000000104
スケールアウト
試せていないので別途・・・