AWS の利用料金をチャート化するボットを Next generation Slack platform で作ってみた

はじめに
平素は大変お世話になっております。
クイックガードのパー子です。
検証作業で作成したクラウド・リソースを、たまに消し忘れてそのまま放置してしまうことはありませんか?
そんな場合にコストが微妙にかかり続けていることに気づきたいので、直近の請求分をチャート化して定期的に Slack へ投稿するボットを作りました。
技術選定
実現方式はいろいろありますが、今回は Next generation Slack platform を試してみることにします。
クラウド・プロバイダの料金API の呼び出しやチャート描画&画像化など技術面でのハードルがいくつも予想されますが、使用感の検証も兼ねてチャレンジします。
Next generation Slack platform の特徴
このプラットフォームでは、作成したアプリは Slack のマネージド環境にホスティングされます。
自分でサーバを用意する必要はありません。
データストア (バックエンドは Amazon DynamoDB) もマネージドで提供されています。
また、専用の CLI を用いて開発、デプロイ、設定管理を行います。
開発に用いる環境は Deno + TypeScript です。
アプリを構成する基本的な要素は次の 3つで、
Function で 1つ1つの独立した処理を定義し、これらを組み合わせて Workflow を定義。
そして、Trigger で指定したタイミングで Workflow を起動する、という関係性です。
Next generation Slack platform とはつまり、Slack との連携に特化したワークフロー基盤なのですね。
実装する
それでは実際に作り始めていきます。
今回作成するアプリは、指定した AWSアカウントの利用料金の推移を見やすくチャート化して定期的に投稿してくれるものです。
チャート化する期間は、短スパンVer. として直近 1週間、および、長スパンVer. の直近半年の 2種類とし、これらをそれぞれ週次、月次で投稿するようにします。
また、管理している AWSアカウントが複数あるため、それらをまとめて 1枚のチャートに描画できるようにします。
なお、以降の文章で “Workflow” と “ワークフロー” を以下のように使い分けるのでご留意ください。
- Workflow: Next generation Slack platform としての Workflowコンポーネント
- ワークフロー: 一般的な概念としての一連の処理の流れ
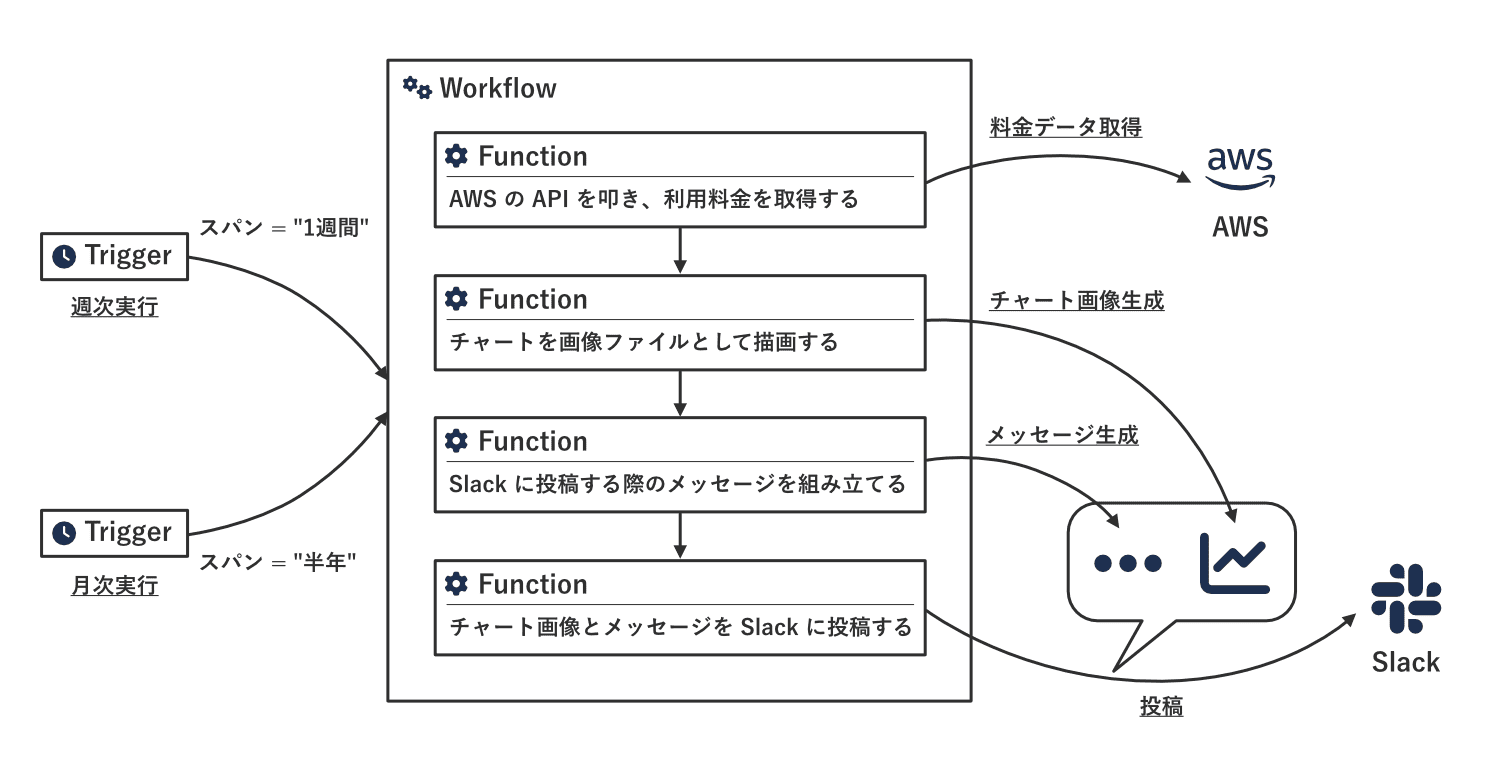
ワークフローの構成
まずはワークフローの構成を考えます。
一連のフローを独立した処理ごとに分割すると、以下のような分け方になりそうです。
この単位で Function を実装してみます。
- AWS の API を叩き、利用料金を取得する。
- チャートを画像ファイルとして描画する。
- Slack に投稿する際のメッセージを組み立てる。
- チャート画像とメッセージを Slack に投稿する。
スパンの長短にかかわらず Workflow と Function は共通とし、引数としてスパンを与えることで処理を切り替えるようにします。
下準備
下準備として、とりあえず Getting started にしたがってサクッとアプリの雛形を生成しておきます。
Function
上述のワークフロー構成に基づいて各Function を実装します。
各ステップと Function名の対応関係は次のとおりです。
| # | ステップ | Function名 |
|---|---|---|
| 1 | AWS の API を叩き、利用料金を取得する | fetch_cost_data_function |
| 2 | チャートを画像ファイルとして描画する | draw_chart_function |
| 3 | Slack に投稿する際のメッセージを組み立てる | build_chat_message_function |
| 4 | チャート画像とメッセージを Slack に投稿する | post_chart_function |
1. AWS の API を叩き、利用料金を取得する
AWS の API を叩くために SDK を使いたいところですが、残念ながら Deno用の AWS公式モジュールは用意されていません。
そこで、GitHub の Issue で言及されているように、esm.sh経由で読み込みます。
利用料金の取得のために使用する API は Cost Explorer の GetCostAndUsage なので、@aws-sdk/client-cost-explorerモジュール を読み込みます。
アプリの雛形には import_map.json が用意されているので、ここに追加します。
(ついでに Deno の 標準ライブラリ も併せて追加します。)
import_map.json
{
  "imports": {
    ...
    "@aws-sdk/client-cost-explorer": "https://esm.sh/@aws-sdk/client-cost-explorer@3.436.0",
    "std/": "https://deno.land/std@0.205.0/"
  }
}
これで CostExplorerClient + GetCostAndUsageCommand を使えるようになりましたが、Next generation Slack platform では今のところ、AWS API を叩くためにはクレデンシャルとして access_key_id と secret_access_key の組を渡しておかないといけません。
(OpenID Connect でゴニョゴニョ… のような連携はできません。)
クレデンシャルのような秘匿情報は slack env addコマンドで環境変数としてセットすることが推奨されていますが、アプリをデプロイしてからでないとセットできないので後ほど実施します。
GetCostAndUsage API のリクエスト・パラメータは以下とします。
(一般的なリクエスト形式だと思うので、意図はググっていただければすぐわかると思います。)
{
  "Metrics": ["AmortizedCost"],
  "Filter": {
    "And": [
      {
        "Not": {
          "Dimensions": {
            "Key": "RECORD_TYPE",
            "Values": ["Credit", "Refund", "Upfront", "Tax"]
          }
        }
      },
      {
        "Dimensions": {
          "Key": "LINKED_ACCOUNT",
          "Values": [<アカウント1>, <アカウント2>, ...]
        }
      }
    ]
  },
  "GroupBy": [
    {
      "Type": "DIMENSION",
      "Key": "LINKED_ACCOUNT"
    }
  ]
}
API で得られたレスポンスを、続くステップで扱いやすいように以下の形式へ変換することにします。
このデータを当該Function の出力として後続の Function に渡します。
{
  "accounts": [<表示名@アカウント1>, <表示名@アカウント2>, ...],
  "metrics": [
    {
      "date": <タイムスタンプ>,
      "values": [<金額@アカウント1>, <金額@アカウント2>, ...]
    },
    {
      "date": <タイムスタンプ>,
      "values": [<金額@アカウント1>, <金額@アカウント2>, ...]
    },
    ...
  ]
}
Custom type としてこのデータ型を定義しておくと便利です。
types/cost_and_usage.ts
import { DefineType, Schema } from "deno-slack-sdk/mod.ts";

export type CostAndUsageAccount = string;

export type CostAndUsageMetric = {
  date: number;
  values: number[];
};

export type CostAndUsage = {
  accounts: CostAndUsageAccount[];
  metrics: CostAndUsageMetric[];
};

export const CostAndUsageMetricType = DefineType({
  name: "CostAndUsageMetric",
  type: Schema.types.object,
  properties: {
    date: {
      type: Schema.types.integer,
      description: "料金の発生日時 (UNIX時刻のミリ秒表現)",
    },
    values: {
      type: Schema.types.array,
      description: "AWSアカウントごとの料金 (ドル)",
      items: {
        type: Schema.types.number,
      },
    },
  },
  required: [
    "date",
    "values",
  ],
});

export const CostAndUsageType = DefineType({
  name: "CostAndUsage",
  type: Schema.types.object,
  description: "料金データ",
  properties: {
    accounts: {
      type: Schema.types.array,
      description: "AWSアカウント名",
      items: {
        type: Schema.types.string,
      },
    },
    metrics: {
      type: Schema.types.array,
      description: "料金メトリクス",
      items: {
        // NOTE: 1つの型定義の中で object -> array -> object とネストさせると以下のエラーが発生するので、独立した型を定義するようにした。
        //       "Unexpected schema encountered for `object` type: failed to match exactly one allowed schema for `properties/metrics` - {"type":"one_of"} (failed_constraint)"
        type: CostAndUsageMetricType,
      },
    },
  },
  required: [
    "accounts",
    "metrics",
  ],
});
補足
上記コード中のコメントに書かれているように、複雑にネストさせた型を一気に定義すると謎のエラーが発生します。
ワークアラウンドとして、要素ごとに細かく型を定義して組み合わせることで対処しました。
この Function は引数として AWSアカウントID のリストとスパンの長短を受け取ることにします。
AWSアカウントID は、本来は Array で受け取りたいところですが、後述するように Array での受け渡しに難があるため、カンマ区切りの String とします。
面倒ですが、いちいち split で分解してから使うことにします。
スパンの長短は文字列として “1-week” か “6-months” を指定します。
これも Custom type として定義します。
types/fetch_scope.ts
import { DefineType, Schema } from "deno-slack-sdk/mod.ts";

const fetchScope = [
  "1-week",
  "6-months",
] as const;

export type FetchScope = typeof fetchScope[number];

export const FetchScopeType = DefineType({
  name: "FetchScope",
  type: Schema.types.string,
  description: "取得範囲",
  enum: fetchScope,
});
スパンの指定値に基づいて料金データの取得する期間を切り替えるのですが、これを実装しやすいように Scopeモデルを作成します。
アプリの雛形には適切な格納場所が含まれていないので、勝手に ./models/ というディレクトリを作ってしまうことにします。
Formatter や Linter が効くように deno.jsonc にも登録しておきます。
deno.jsonc
{
  ...
  "fmt": {
    "include": [
      ...
      "./models/"
    ]
  },
  ...
  "lint": {
    "include": [
      ...
      "./models/"
    ]
  },
  ...
}
Scopeモデルは、それぞれのスパンを表す models/scope/<スパン>.ts と、ファクトリーとしての models/scope.ts で構成されます。
ここでモデルに必要なインターフェイスは、GetCostAndUsage API の リクエスト に用いる TimePeriod および Granularity を返すメソッドです。
models/scope.ts
import { Scope1week } from "./scope/1week.ts";
import { Scope6months } from "./scope/6months.ts";

import type { Granularity } from "@aws-sdk/client-cost-explorer";
import type { FetchScope } from "../types/fetch_scope.ts";

export type YearMonthDay = [number, number, number];

export interface Scope {
  //
  // "TimePeriod"パラメータを返す。
  //
  timePeriod(
    now: Date,
  ): {
    start: YearMonthDay;
    end: YearMonthDay;
  };

  //
  // "Granularity"パラメータを返す。
  //
  granularity(): Granularity;
}

//
// Scopeインスタンスを生成する。
//
export const createScope = (scope: FetchScope) => {
  switch (scope) {
    case "1-week":
      return new Scope1week();
    case "6-months":
      return new Scope6months();
    default:
      throw new Error(`不正なスコープです: ${scope}`);
  }
};
models/scope/1week.ts
import type { Granularity } from "@aws-sdk/client-cost-explorer";
import type { Scope, YearMonthDay } from "../scope.ts";

//
// 短スパン (直近1週間)
//
export class Scope1week implements Scope {
  timePeriod(now: Date) {
    return {
      start: [
        now.getFullYear(),
        now.getMonth(),
        now.getDate() - 8,
      ] as YearMonthDay,
      end: [
        now.getFullYear(),
        now.getMonth(),
        now.getDate() - 1,
      ] as YearMonthDay,
    };
  }

  granularity(): Granularity {
    return "DAILY";
  }
}
models/scope/6months.ts
import type { Granularity } from "@aws-sdk/client-cost-explorer";
import type { Scope, YearMonthDay } from "../scope.ts";

//
// 長スパン (直近半年)
//
export class Scope6months implements Scope {
  timePeriod(now: Date) {
    return {
      start: [
        now.getFullYear(),
        now.getMonth() - 6,
        1,
      ] as YearMonthDay,
      end: [
        now.getFullYear(),
        now.getMonth(),
        1,
      ] as YearMonthDay,
    };
  }

  granularity(): Granularity {
    return "MONTHLY";
  }
}
以上を実装した Function のコード全体は以下のようになります。
(長いので折り畳んでいます。展開してご覧ください。)
functions/fetch_cost_data_function.ts
import {
  CostExplorerClient,
  GetCostAndUsageCommand,
} from "@aws-sdk/client-cost-explorer";
import { DefineFunction, Schema, SlackFunction } from "deno-slack-sdk/mod.ts";
import { format } from "std/datetime/mod.ts";
import { createScope } from "../models/scope.ts";
import { CostAndUsageType } from "../types/cost_and_usage.ts";
import { FetchScopeType } from "../types/fetch_scope.ts";

import type {
  DimensionValuesWithAttributes,
  GetCostAndUsageCommandOutput,
  ResultByTime,
} from "@aws-sdk/client-cost-explorer";
import type { YearMonthDay } from "../models/scope.ts";
import type {
  CostAndUsage,
  CostAndUsageAccount,
  CostAndUsageMetric,
} from "../types/cost_and_usage.ts";
import type { FetchScope } from "../types/fetch_scope.ts";

export const FetchCostDataFunctionDefinition = DefineFunction({
  callback_id: "fetch_cost_data_function",
  title: "Fetch cost data function",
  description: "AWS の料金データを取得する。",
  source_file: "./functions/fetch_cost_data_function.ts",
  input_parameters: {
    properties: {
      scope: {
        type: FetchScopeType,
        description: "取得範囲",
      },
      accountIds: {
        type: Schema.types.string,
        description: "AWSアカウントID (カンマ区切り)",
      },
    },
    required: [
      "scope",
      "accountIds",
    ],
  },
  output_parameters: {
    properties: {
      data: {
        type: CostAndUsageType,
        description: "料金データ",
      },
    },
    required: [],
  },
});

export default SlackFunction(
  FetchCostDataFunctionDefinition,
  async ({ inputs, env }) => {
    const accountIds = splitCSV(inputs.accountIds);

    try {
      const response = await getCostAndUsage(
        env.AWS_REGION,
        env.AWS_ACCESS_KEY_ID,
        env.AWS_SECRET_ACCESS_KEY,
        accountIds,
        inputs.scope as FetchScope,
      );

      const data = alignCostData(response, accountIds);

      return {
        outputs: {
          data: data,
        },
      };
    } catch (e) {
      console.log(e);

      return {
        error: "料金データの取得に失敗しました。",
        outputs: {},
      };
    }
  },
);

//
// カンマ区切りの文字列を配列に分解する。
//
const splitCSV = (str: string) => {
  return str.split(",").map((x) => x.trim());
};

//
// CostExplorer GetCostAndUsage API を叩く。
//
const getCostAndUsage = async (
  region: string,
  accessKeyId: string,
  secretAccessKey: string,
  accountIds: string[],
  scope: FetchScope,
) => {
  const costExplorerClient = new CostExplorerClient({
    region: region,
    credentials: {
      accessKeyId: accessKeyId,
      secretAccessKey: secretAccessKey,
    },
  });

  return await costExplorerClient.send(
    new GetCostAndUsageCommand({
      ...timeQuery(scope),
      ...{
        Metrics: [
          "AmortizedCost",
        ],
        Filter: {
          And: [
            {
              Not: {
                Dimensions: {
                  Key: "RECORD_TYPE",
                  Values: [
                    "Credit",
                    "Refund",
                    "Upfront",
                    "Tax",
                  ],
                },
              },
            },
            {
              Dimensions: {
                Key: "LINKED_ACCOUNT",
                Values: accountIds,
              },
            },
          ],
        },
        GroupBy: [
          {
            Type: "DIMENSION",
            Key: "LINKED_ACCOUNT",
          },
        ],
      },
    }),
  );
};

//
// 料金データを取得する日時範囲を返す。
//
const timeQuery = (scope: FetchScope) => {
  const formatTimePeriod = (times: YearMonthDay) => {
    return format(new Date(Date.UTC(...times)), "yyyy-MM-dd");
  };

  const now = new Date();

  const scoper = createScope(scope);

  const { start, end } = scoper.timePeriod(now);

  return {
    TimePeriod: {
      Start: formatTimePeriod(start),
      End: formatTimePeriod(end),
    },
    Granularity: scoper.granularity(),
  };
};

//
// 料金データをグラフ化しやすい形式に再配列する。
//
const alignCostData = (
  response: GetCostAndUsageCommandOutput,
  accountIds: string[],
): CostAndUsage => {
  const resultsByTime = response.ResultsByTime;

  if (!resultsByTime) {
    return {
      accounts: [],
      metrics: [],
    };
  }

  return {
    accounts: alignAccounts(response.DimensionValueAttributes, accountIds),
    metrics: alignValues(resultsByTime, accountIds),
  };
};

//
// AWSアカウントID を整列する。
//
const alignAccounts = (
  dimensionValuesWithAttributes: DimensionValuesWithAttributes[] | undefined,
  accountIds: string[],
): CostAndUsageAccount[] => {
  return accountIds.map((accountId) => {
    const dimensionValuesWithAttribute = dimensionValuesWithAttributes?.find(
      (dimensionValuesWithAttribute) => {
        return accountId === dimensionValuesWithAttribute.Value;
      },
    );

    return dimensionValuesWithAttribute?.Attributes?.description ?? accountId;
  });
};

//
// 利用料金を整列する。
//
const alignValues = (
  resultsByTimes: ResultByTime[],
  accountIds: string[],
) => {
  return resultsByTimes.map((result) => {
    const time = result.TimePeriod?.Start;

    if (!time) {
      return null;
    }

    const values = accountIds.map((accountId) => {
      const group = result.Groups?.find((group) => {
        return accountId === group.Keys?.at(0);
      });

      return Number(
        group?.Metrics?.AmortizedCost?.Amount ?? "-1",
      );
    });

    return {
      date: new Date(time).getTime(),
      values: values,
    };
  }).filter((x): x is CostAndUsageMetric => x !== null);
};
2. チャートを画像ファイルとして描画する
この Function の引数は、スパンの長短と、前Function の出力値である料金データです。
出力として、生成した画像を Base64 した文字列を返すようにします。
サーバ上でチャートを生成したい場合、chartjs-node-canvas (Chart.js) が有名です。
しかし、chartjs-node-canvas は canvas という Cairo依存のパッケージを内部で利用しており、環境構成に制約のある Slack のマネージド環境で使うのは相当な困難が予想されました。
そこで、環境に依存せず、純粋な JavaScript で完結するライブラリとして、(チャート生成専用のライブラリではありませんが) D3.js を用いることにします。
D3.js は DOM を操作して SVG を組み立てるライブラリです。
Deno は DOM API をサポートしていないため、Deno上で D3.js を動かすには何らかの DOM実装を使用する必要があります。
Deno の マニュアル では LinkeDOM、Deno DOM、jsdom の 3つが紹介されていますが、ここでは LinkeDOM を使うことにしました。
(他のライブラリは D3.js と相性が悪いのか、よくわからないエラーが出てうまく動かなかったので秒速で諦めました。)
また、D3.js が生成するチャートはあくまで SVG として描画されるだけなので、これを画像として出力しないといけません。
この変換には svg2png-wasm を利用します。
以上のモジュールを import_map.json に追加します。
import_map.json
{
  "imports": {
    ...
    "d3": "https://esm.sh/d3@7.8.5",
    "linkedom": "https://esm.sh/linkedom@0.16.1",
    "svg2png-wasm": "https://esm.sh/svg2png-wasm@1.4.1"
  }
}
svg2png-wasm を Slack のマネージド環境で使う際の注意点が 2つあります。
- 初期化
- フォントの読み込み
svg2png-wasm を使用するためには、まず初期化処理として initialize() を実行して Wasmモジュールをロードする必要があります。
一方、Slackプラットフォーム上で動くプロセスの生存期間はかなり長く、複数回の Workflow実行にわたって起動済みの同じプロセスを再利用するようです。
そのため、Workflow が実行されるたびに毎回 initialize() が呼ばれることになるのですが、いったん初期化したあとに再度この関数を実行すると エラーが発生 してしまいます。
回避策として、(初期化済みの場合にエラーを出さずスキップするようなオプションが見当たらなかったため) ちょっとダサいですが catch して握り潰すことにします。
続いて、2つ目のフォントの読み込み問題です。
SVG中にテキストが含まれる場合、画像を生成する際にフォント・データを明示的に指定する必要があるのですが、Slackプラットフォームにはソースコード以外のファイルをデプロイできません。
(内部的には esbuild でバンドルしてデプロイしているようなので、頑張ればフォント・ファイルもバンドルできるのかもしれませんが…。)
そこで、ものすごく Hacky ですが、「フォント・ファイルを文字列にエンコードし定数としてコード上に定義しておく&使用する際に元のバイナリへデコードする」というワークアラウンドで逃げることにします。
なお、フォントは Noto Sans Japanese の Lightウエイトを使用することにします。
models/font.ts
import { decodeBase64 } from "std/encoding/base64.ts";

//
// Noto Sans JP のフォント・データを返す。
//
export const notoSansJPLight = () => {
  const blob = new Blob([decodeBase64(notoSansJPLightData)]);

  const reader = blob.stream().pipeThrough(
    new DecompressionStream("gzip"),
  ).getReader();

  return read(reader, new Uint8Array(0));
};

//
// Stream からデータを読み込む。
//
const read = async (
  reader: ReadableStreamDefaultReader<Uint8Array>,
  base: Uint8Array,
): Promise<Uint8Array> => {
  const { done, value } = await reader.read();

  if (done) {
    return base;
  } else {
    return read(reader, mergeData(base, value));
  }
};

//
// 2つの Uint8Array を連結する。
//
const mergeData = (arr1: Uint8Array, arr2: Uint8Array) => {
  const merged = new Uint8Array(arr1.length + arr2.length);

  merged.set(arr1);
  merged.set(arr2, arr1.length);

  return merged;
};

// NOTE: フォント・ファイルを gzip + Base64 した文字列。
//       `$ cat ./NotoSansJP-Light.ttf | gzip -9 -c | base64 -b 500`
const notoSansJPLightData =
  `H4sICDs3ZWUCA2EA3H0HfBR...tQHEXMIR+tsqg
.......................................
........(500文字/行で 8,700行ほど)........
.......................................`;
補足
gzip の展開には compress という準公式っぽい (ちょっと位置付けがわからない) ライブラリが使えそうなのですが、依存する標準ライブラリ (std) のバージョンが古すぎてうまくビルドできませんでした。
(最終リリースが 2年前で、それ以降、依存バージョンの更新も行われていません。)
$ slack deploy
...
⠸ Packaging app for deployment✘ [ERROR] specifier was a bare specifier, but was not remapped to anything by importMap. [plugin deno-resolver]
https://deno.land/std@0.129.0/node/_events.mjs:153:30:
153 │ ...  isEventTarget = require("internal/event_target").isEventTarget;
╵                              ~~~~~~~~~~~~~~~~~~~~~~~
Error bundling function file "draw_chart_function" with esbuild
代わりに Compression Streams API の DecompressionStream で展開しています。
X軸の目盛りの単位はスパンの長短で変わります。
- 短 (直近1週間): 1日
- 長 (直近半年): 1月
これを Scopeモデルに実装します。
models/scope.ts
...
import type { CountableTimeInterval } from "d3";

export type AxisFormat = [CountableTimeInterval, string];

export interface Scope {
  ...
  //
  // X軸目盛りの日時フォーマット (@D3.js) を返す。
  //
  axisXFormat(): AxisFormat;
}
...
models/scope/1week.ts
...
import { utcDay } from "d3";

import type { AxisFormat } from "../scope.ts";

export class Scope1week implements Scope {
  ...
  axisXFormat(): AxisFormat {
    return [utcDay, "%Y-%m-%d"];
  }
}
models/scope/6months.ts
...
import { utcMonth } from "d3";

import type { AxisFormat } from "../scope.ts";

export class Scope6months implements Scope {
  ...
  axisXFormat(): AxisFormat {
    return [utcMonth, "%Y-%m"];
  }
}
Function のコード全体は以下です。
functions/draw_chart_function.ts
/// <reference lib="dom" />

import * as d3 from "d3";
import { DefineFunction, Schema, SlackFunction } from "deno-slack-sdk/mod.ts";
import { DOMParser } from "linkedom";
import { encodeBase64 } from "std/encoding/base64.ts";
import * as svg2png from "svg2png-wasm";
import { notoSansJPLight } from "../models/font.ts";
import { createScope } from "../models/scope.ts";
import { CostAndUsageType } from "../types/cost_and_usage.ts";
import { FetchScopeType } from "../types/fetch_scope.ts";

import type {
  CostAndUsage,
  CostAndUsageMetric,
} from "../types/cost_and_usage.ts";
import type { FetchScope } from "../types/fetch_scope.ts";

type SVG = d3.Selection<SVGSVGElement, unknown, null, undefined>;

type AxisX = d3.ScaleTime<number, number, never>;
type AxisY = d3.ScaleLinear<number, number, never>;

type Colors = d3.ScaleOrdinal<string, string, never>;

export const DrawChartFunctionDefinition = DefineFunction({
  callback_id: "draw_chart_function",
  title: "Draw chart function",
  description: "チャートを描画して PNG画像として出力する。",
  source_file: "./functions/draw_chart_function.ts",
  input_parameters: {
    properties: {
      scope: {
        type: FetchScopeType,
        description: "取得範囲",
      },
      data: {
        type: CostAndUsageType,
        description: "料金データ",
      },
    },
    required: [
      "scope",
      "data",
    ],
  },
  output_parameters: {
    properties: {
      image: {
        type: Schema.types.string,
        description: "PNGデータ (Base64)",
      },
    },
    required: [],
  },
});

//
// チャートのスタイル
//
const style = {
  size: {
    canvas: {
      width: 800,
      height: 600,
      padding: {
        top: 20,
        right: 40,
        bottom: 40,
        left: 40,
      },
    },
    axis: {
      marginRatio: {
        top: 1.1,
      },
    },
    grid: {
      offset: {
        right: 6,
        left: -6,
      },
    },
    label: {
      y: {
        position: {
          top: 16,
          left: -32,
        },
      },
    },
    line: {
      width: 1.5,
    },
    legend: {
      area: {
        position: {
          top: 20,
          left: 680,
        },
      },
      rect: {
        size: 12,
        margin: 3,
      },
      font: {
        size: 10,
      },
    },
  },
  color: {
    text: "#262626",
    background: "#ffffff",
    grid: {
      opacity: 0.1,
    },
    line: {
      spectral: {
        ratio: 0.8,
        offset: 0.1,
      },
    },
  },
};

export default SlackFunction(
  DrawChartFunctionDefinition,
  async ({ inputs }) => {
    try {
      const svg = createSvg();

      const axisX = drawAxisX(inputs.data, svg, inputs.scope as FetchScope);
      const axisY = drawAxisY(inputs.data, svg);

      const colors = createColors(inputs.data);

      drawLines(inputs.data, svg, axisX, axisY, colors);

      addLegend(inputs.data, svg, colors);

      const png = await dumpImage(svg);

      return {
        outputs: {
          image: encodeBase64(png),
        },
      };
    } catch (e) {
      console.log(e);

      return {
        error: "チャートの生成に失敗しました。",
        outputs: {},
      };
    }
  },
);

//
// SVG領域を確保する。
//
const createSvg = () => {
  const document = new DOMParser().parseFromString(
    "<!DOCTYPE html><html><body></body></html>",
    "text/html",
  );

  const svg = d3.select(document.body)
    .append("svg")
    .attr("xmlns", "http://www.w3.org/2000/svg")
    .attr("width", style.size.canvas.width)
    .attr("height", style.size.canvas.height)
    .attr("viewBox", [0, 0, style.size.canvas.width, style.size.canvas.height])
    .attr("color", style.color.text);

  svg.append("rect")
    .attr("x", 0)
    .attr("y", 0)
    .attr("width", style.size.canvas.width)
    .attr("height", style.size.canvas.height)
    .attr("fill", style.color.background);

  return svg;
};

//
// X軸を描画する。
//
const drawAxisX = (data: CostAndUsage, svg: SVG, scope: FetchScope) => {
  const [start, end] = d3.extent(data.metrics, (d) => new Date(d.date));

  const axis = d3.scaleUtc()
    .domain([
      start ?? new Date(0),
      end ?? new Date(0),
    ])
    .range([
      style.size.canvas.padding.left,
      style.size.canvas.width - style.size.canvas.padding.right,
    ]);

  svg.append("g")
    .attr(
      "transform",
      `translate(0, ${
        style.size.canvas.height - style.size.canvas.padding.bottom
      })`,
    )
    .call(
      d3.axisBottom(axis).ticks(
        ...(
          createScope(scope).axisXFormat()
        ),
      ),
    );

  return axis;
};

//
// Y軸を描画する。
//
const drawAxisY = (data: CostAndUsage, svg: SVG) => {
  const end = d3.max(data.metrics.map((d) => d.values).flat());

  const axis = d3.scaleLinear()
    .domain([
      0,
      (end ?? 0) * style.size.axis.marginRatio.top,
    ])
    .range([
      style.size.canvas.height - style.size.canvas.padding.bottom,
      style.size.canvas.padding.top,
    ]);

  // Ref: https://observablehq.com/@d3/line-chart/2?intent=fork
  svg.append("g")
    .attr("transform", `translate(${style.size.canvas.padding.left}, 0)`)
    .call(d3.axisLeft(axis))
    .call((g) => {
      g.select(".domain").remove();
    })
    .call((g) => {
      const lines = g.selectAll(".tick line");

      lines.attr("x1", style.size.grid.offset.left)
        .attr(
          "x2",
          style.size.canvas.width - style.size.canvas.padding.left -
            style.size.canvas.padding.right + style.size.grid.offset.right,
        );

      lines.filter((_, i) => i !== 0)
        .attr("stroke-opacity", style.color.grid.opacity);
    })
    .call((g) => {
      g.append("text")
        .attr("x", style.size.label.y.position.left)
        .attr("y", style.size.label.y.position.top)
        .attr("fill", "currentColor")
        .attr("text-anchor", "start")
        .text("Cost ($)");
    });

  return axis;
};

//
// 折れ線グラフで使用する色を定義する。
//
const createColors = (data: CostAndUsage) => {
  return d3.scaleOrdinal<string, string>()
    .domain(data.accounts)
    .range(
      d3.quantize(
        (t) =>
          d3.interpolateSpectral(
            t * style.color.line.spectral.ratio +
              style.color.line.spectral.offset,
          ),
        data.accounts.length,
      ).reverse(),
    );
};

//
// 折れ線を描画する。
//
const drawLines = (
  data: CostAndUsage,
  svg: SVG,
  axisX: AxisX,
  axisY: AxisY,
  colors: Colors,
) => {
  data.accounts.forEach((v, i) => {
    const line = d3.line<CostAndUsageMetric>()
      .x((d) => axisX(new Date(d.date)))
      .y((d) => axisY(d.values[i]));

    svg.append("path")
      .attr("fill", "none")
      .attr("stroke", colors(v))
      .attr("stroke-width", style.size.line.width)
      .attr("d", line(data.metrics));
  });
};

//
// 凡例を掲出する。
//
const addLegend = (data: CostAndUsage, svg: SVG, colors: Colors) => {
  svg.append("g")
    .attr(
      "transform",
      `translate(${style.size.legend.area.position.left}, ${style.size.legend.area.position.top})`,
    )
    .attr("font-size", style.size.legend.font.size)
    .attr("font-family", "sans-serif")
    .call((g) => {
      const rectSise = style.size.legend.rect.size +
        style.size.legend.rect.margin * 2;

      data.accounts.forEach((v, i) => {
        g.append("g")
          .attr(
            "transform",
            `translate(0, ${rectSise * i})`,
          )
          .call((legendItem) => {
            legendItem.append("rect")
              .attr("x", style.size.legend.rect.margin)
              .attr("y", style.size.legend.rect.margin)
              .attr("width", style.size.legend.rect.size)
              .attr("height", style.size.legend.rect.size)
              .attr("fill", colors(v));

            legendItem.append("text")
              .attr("x", rectSise)
              .attr("y", (rectSise + style.size.legend.font.size) * 0.5 - 1)
              .attr("fill", "currentColor")
              .text(v);
          });
      });
    });
};

//
// PNG画像として出力する。
//
const dumpImage = async (svg: SVG) => {
  try {
    await svg2png.initialize(
      fetch("https://unpkg.com/svg2png-wasm/svg2png_wasm_bg.wasm"),
    );
  } catch (_) {
    //  NOTE: ランタイムの生存期間が長く、複数回のワークフロー実行にわたってプロセスが維持されることがあるようだ。
    //        その場合、何度も initialize() が走ることになるが、すでに初期化されている場合はエラーが投げられる。
    //        Ref: https://github.com/ssssota/svg2png-wasm/blob/svg2png-wasm%401.4.1/lib/index.ts#L17-L21
  }

  return await svg2png.svg2png(
    svg.node()!.outerHTML,
    {
      fonts: [
        await notoSansJPLight(),
      ],
      defaultFontFamily: {
        sansSerifFamily: "Noto Sans JP",
      },
    },
  );
};
補足
Triple-slash directives で DOM の型定義を適用するようにしています。
これがないと「SVGSVGElement なんて型は存在しないよ」と怒られます。
(ただ、私は TypeScript に詳しくないので本当にこんな場当たり的 (?) な対処方法でよいのかわかりません… 誰か教えてください。)
補足
チャートの描画ロジックは 公式サイトから張られている Example を参考にしました。
色セットの生成処理がわかりづらいですが、これは Donut chart の Example から拝借しました。
なお、セットが 1色の場合は黒色 (#000000) になります。
Slack に投稿する際のメッセージを組み立てる
生成された画像だけ投稿されてもわかりづらいので、画像に付随する説明文を組み立てます。
引数としてスパンの長短や料金データを受け取り、Markdown形式の投稿メッセージを出力します。
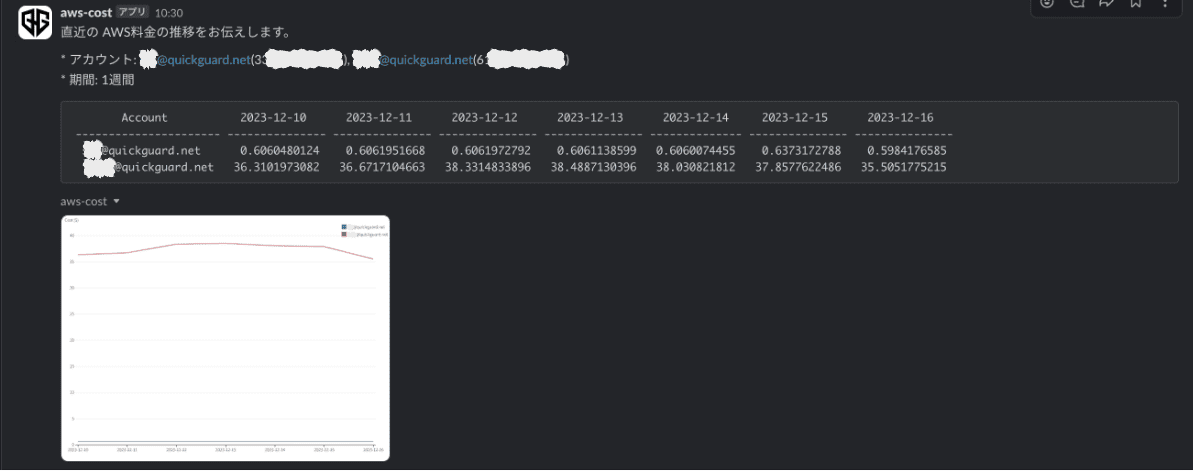
直近の AWS料金の推移をお伝えします。

* アカウント: {表示名@アカウント1}({ID@アカウント1}), {表示名@アカウント2}({ID@アカウント2}), ...
* 期間: {'1週間' | '6か月間'}

```
      Account       {日時1}    {日時2}     ...
------------------ --------- --------- ---------
 {表示名@アカウント1}    {金額}     {金額}      ...
 {表示名@アカウント2}    {金額}     {金額}      ...
 ...
```
スパンの日本語表現と表ヘッダの日時フォーマットを返せるように、Scopeモデルに以下の実装を追加します。
models/scope.ts
...
export interface Scope {
  ...
  //
  // スパンの日本語表現を返す。
  //
  text(): string;

  //
  // 表への列挙時の日時フォーマット (@Deno std/datetime) を返す。
  // Ref: https://deno.land/std/datetime/mod.ts
  //
  tableHeadFormat(): string;
}
...
models/scope/1week.ts
...
export class Scope1week implements Scope {
  ...
  text() {
    return "1週間";
  }

  tableHeadFormat() {
    return "yyyy-MM-dd";
  }
}
models/scope/6months.ts
...
export class Scope6months implements Scope {
  ...
  text() {
    return "6か月間";
  }

  tableHeadFormat() {
    return "yyyy-MM";
  }
}
表組みを自前で実装するのは面倒なので、ascii_table というライブラリを利用します。
import_map.json
{
  "imports": {
    ...
    "ascii_table/": "https://deno.land/x/ascii_table@v0.1.0/"
  }
}
Function のコード全体は以下です。
functions/build_chat_message_function.ts
import AsciiTable from "ascii_table/mod.ts";
import { DefineFunction, Schema, SlackFunction } from "deno-slack-sdk/mod.ts";
import { zip } from "std/collections/mod.ts";
import { format } from "std/datetime/mod.ts";
import { createScope } from "../models/scope.ts";
import { CostAndUsageType } from "../types/cost_and_usage.ts";
import { FetchScopeType } from "../types/fetch_scope.ts";

import type {
  CostAndUsage,
  CostAndUsageAccount,
} from "../types/cost_and_usage.ts";
import type { FetchScope } from "../types/fetch_scope.ts";

export const BuildChatMessageFunctionDefinition = DefineFunction({
  callback_id: "build_chat_message_function",
  title: "Build chat message function",
  description: "投稿メッセージを組み立てる。",
  source_file: "./functions/build_chat_message_function.ts",
  input_parameters: {
    properties: {
      scope: {
        type: FetchScopeType,
        description: "取得範囲",
      },
      accountIds: {
        type: Schema.types.string,
        description: "AWSアカウントID (カンマ区切り)",
      },
      data: {
        type: CostAndUsageType,
        description: "料金データ",
      },
    },
    required: [
      "scope",
      "accountIds",
      "data",
    ],
  },
  output_parameters: {
    properties: {
      message: {
        type: Schema.types.string,
        description: "投稿メッセージ",
      },
    },
    required: [],
  },
});

export default SlackFunction(
  BuildChatMessageFunctionDefinition,
  ({ inputs }) => {
    const scoper = createScope(inputs.scope as FetchScope);

    try {
      return {
        outputs: {
          message: [
            "直近の AWS料金の推移をお伝えします。",
            "",
            `* アカウント: ${
              accounts(inputs.accountIds, inputs.data.accounts).join(", ")
            }`,
            `* 期間: ${scoper.text()}`,
            "",
            "```",
            tabulate(inputs.data, scoper.tableHeadFormat()),
            "```",
          ].join("\n"),
        },
      };
    } catch (e) {
      console.log(e);

      return {
        error: "投稿メッセージの生成に失敗しました。",
        outputs: {},
      };
    }
  },
);

//
// アカウント名を列挙する。
//
const accounts = (
  accountIds: string,
  accountNames: CostAndUsageAccount[],
) => {
  const splitCSV = (str: string) => {
    return str.split(",").map((x) => x.trim());
  };

  return zip(
    splitCSV(accountIds),
    accountNames,
  ).map((x) => {
    return `${x[1]}(${x[0]})`;
  });
};

//
// 料金データを表形式で出力する。
//
const tabulate = (data: CostAndUsage, timeFormat: string) => {
  const table = new AsciiTable();

  table.setHeading(
    "Account",
    ...(
      data.metrics.map((x) => format(new Date(x.date), timeFormat))
    ),
  );

  const rows = data.accounts.map((account, i) => {
    const values = data.metrics.map((x) => {
      return x.values[i];
    });

    return [account, values].flat();
  });

  table.addRowMatrix(rows)
    .removeBorder();

  // @ts-expect-error:
  //   `removeBorder()` は見出し行下のセパレータまでクリアしてしまう。
  //   他に副作用を与えず当該セパレータだけセットするメソッドは用意されていないので、
  //   privateフィールドに直接セットする。
  //
  //   Ref: https://github.com/eeve/ascii_table/blob/v0.1.0/mod.ts#L220
  table.__fill = "-";

  return table.toString();
};
補足
AsciiTable.removeBorder() の Example に少々誤りがあり、実際はヘッダ:ボディ間のセパレータまで消えてしまいます。
そこに区切りがないと見づらいので、__fill という privateフィールドを直接操作するワークアラウンドで対処しました。
チャート画像とメッセージを Slack に投稿する
最後に画像とメッセージを Slack に投稿します。
メッセージだけならば (コーディング不要でそのまま使える、SDK組み込みの) send_message Function を使えるのですが、今回は画像を添付しなければいけません。
ファイルのアップロード用の組み込みFunction は用意されていないため、自分で files.upload API を呼び出すようにします。
Function中では、本来であれば client というプロパティを経由して任意の Slack API を呼び出すことができるのですが、残念ながら files.upload API の場合はこれを使えません。files.upload API は、画像をアップロードする場合は Content-Type として multipart/form-data で POST することを要求する一方、client はリクエスト・パラメータを JSON化して強制的に application/x-www-form-urlencoded で送出する実装になっているのです。
- https://github.com/slackapi/deno-slack-api/blob/2.1.2/src/base-client.ts#L38
- https://github.com/slackapi/deno-slack-api/blob/2.1.2/src/base-client-helpers.ts#L27-L44
- https://github.com/slackapi/deno-slack-api/blob/2.1.2/src/base-client.ts#L45
そのため、直に fetch() でリクエストを投げることにします。
エンドポイントは https://slack.com/api/files.upload で、リクエスト・ボディは FormData で組み立てます。
アクセス・トークンは token というプロパティで取得できるので、これを Authorizationヘッダで渡します。
Function のコード全体は以下です。
functions/post_chart_function.ts
import { DefineFunction, Schema, SlackFunction } from "deno-slack-sdk/mod.ts";
import { decodeBase64 } from "std/encoding/base64.ts";

export const PostChartFunctionDefinition = DefineFunction({
  callback_id: "post_chart_function",
  title: "Post chart function",
  description: "チャートを投稿する。",
  source_file: "./functions/post_chart_function.ts",
  input_parameters: {
    properties: {
      channel: {
        type: Schema.slack.types.channel_id,
        description: "投稿先のチャネル",
      },
      image: {
        type: Schema.types.string,
        description: "PNGデータ (Base64)",
      },
      message: {
        type: Schema.types.string,
        description: "投稿メッセージ",
      },
    },
    required: [
      "channel",
      "image",
      "message",
    ],
  },
  output_parameters: {
    properties: {},
    required: [],
  },
});

export default SlackFunction(
  PostChartFunctionDefinition,
  // NOTE: `client` (deno-slack-api) 経由では "multipart/form-data" で送ることができないため、生の HTTP を叩くようにした。
  async ({ inputs, token }) => {
    const formData = new FormData();

    formData.append("channels", inputs.channel);
    formData.append("initial_comment", inputs.message);
    formData.append(
      "file",
      new Blob([decodeBase64(inputs.image)], { type: "image/png" }),
      "aws-cost.png",
    );

    const response = await fetch("https://slack.com/api/files.upload", {
      method: "POST",
      headers: {
        "Authorization": `Bearer ${token}`,
      },
      body: formData,
    });

    const body = await response.json();

    if (!response.ok) {
      console.log(body);

      return {
        error: "画像のアップロードに失敗しました。",
        outputs: {},
      };
    }

    return {
      outputs: {},
    };
  },
);
Workflow
部品が揃ったので、Workflow を組み立てます。
といっても各Function の Input と Output を順番に繋げるだけなので難しいところはほとんどありませんが、Workflow自体の Inputパラメータの型には注意が必要です。
Object や Array などの複合的な型の使用は許可されていないようで、これらの型を記述すると Shortcut trigger parameters cannot be objects, arrays or timestamps (invalid_interactive_trigger_inputs) などと怒られてしまうのです。
というか、後述するように、そもそも Workflow の前段である Trigger のほうで使用できる Inputパラメータは String しか認められていません。
なので、Workflow においても、Slack固有の型である Schema.slack.types.*以外に使用できるのは実質的に Schema.types.string のみです。
(もしかしたら Trigger の種類によって制約が異なるのかもしれませんが、少なくとも Link trigger と Scheduled trigger で使用可能な型は String のみでした。)
それゆえ、本来は Array で渡したいはずの AWSアカウントID を、致し方なくカンマ区切りで 1つの文字列に畳んで渡していたのでした。
workflows/cost_chart_workflow.ts
import { DefineWorkflow, Schema } from "deno-slack-sdk/mod.ts";
import { BuildChatMessageFunctionDefinition } from "../functions/build_chat_message_function.ts";
import { DrawChartFunctionDefinition } from "../functions/draw_chart_function.ts";
import { FetchCostDataFunctionDefinition } from "../functions/fetch_cost_data_function.ts";
import { PostChartFunctionDefinition } from "../functions/post_chart_function.ts";

const CostChartWorkflow = DefineWorkflow({
  callback_id: "cost_chart_workflow",
  title: "Cost chart workflow",
  description: "直近の使用料金をチャート化して表示する。",
  input_parameters: {
    // NOTE: 入力値として Arrayなどは許可されていないようだ。
    //       それらを指定した場合、以下のエラーが発生する。
    //       "Shortcut trigger parameters cannot be objects, arrays or timestamps (invalid_interactive_trigger_inputs)"
    properties: {
      channel: {
        type: Schema.slack.types.channel_id,
      },
      scope: {
        type: Schema.types.string,
        description: "取得範囲",
      },
      accountIds: {
        type: Schema.types.string,
        description: "AWSアカウントID (カンマ区切り)",
      },
    },
    required: [
      "channel",
      "scope",
      "accountIds",
    ],
  },
});

const fetchCostData = CostChartWorkflow.addStep(
  FetchCostDataFunctionDefinition,
  {
    scope: CostChartWorkflow.inputs.scope,
    accountIds: CostChartWorkflow.inputs.accountIds,
  },
);

const drawChart = CostChartWorkflow.addStep(
  DrawChartFunctionDefinition,
  {
    scope: CostChartWorkflow.inputs.scope,
    data: fetchCostData.outputs.data,
  },
);

const buildChatMessage = CostChartWorkflow.addStep(
  BuildChatMessageFunctionDefinition,
  {
    scope: CostChartWorkflow.inputs.scope,
    accountIds: CostChartWorkflow.inputs.accountIds,
    data: fetchCostData.outputs.data,
  },
);

CostChartWorkflow.addStep(
  PostChartFunctionDefinition,
  {
    channel: CostChartWorkflow.inputs.channel,
    image: drawChart.outputs.image,
    message: buildChatMessage.outputs.message,
  },
);

export default CostChartWorkflow;
Trigger
上記の Workflow を起動するための Trigger を登録します。
スケジュール実行したいので、短スパン用と長スパン用の 2つの Scheduled trigger を定義します。
短スパン (直近1週間) 用は次のようになります。
このように記述することで、2023年09月25日の日本時間10:30:00 を初回起動日時として、その後の同曜日、同時刻に定期的に Workflow が起動されるようになります。
triggers/cost_chart_1week_scheduled_trigger.ts
import { TriggerTypes } from "deno-slack-api/mod.ts";
import { Trigger } from "deno-slack-sdk/types.ts";
import CostChartWorkflow from "../workflows/cost_chart_workflow.ts";

const CostChart1weekScheduledTrigger: Trigger<
  typeof CostChartWorkflow.definition
> = {
  type: TriggerTypes.Scheduled,
  name: "Cost chart 1-week trigger",
  description: "[Scheduled] 直近1週間のチャートを表示する。",
  workflow: `#/workflows/${CostChartWorkflow.definition.callback_id}`,
  schedule: {
    start_time: "2023-09-25T10:30:00+09:00",
    frequency: {
      type: "weekly",
    },
  },
  inputs: {
    channel: {
      value: "<SlackチャネルID>",
    },
    scope: {
      value: "1-week",
    },
    accountIds: {
      value: [
        "<ID@アカウント1>",
        "<ID@アカウント2>",
        ...
      ].join(","),
    },
  },
};

export default CostChart1weekScheduledTrigger;
補足
AWSアカウントID を Array のまま渡そうとすると以下のエラーが発生します。
json: cannot unmarshal array into Go struct field Input.inputs.value of type string
Object や Number も同様に怒られます。
Slack CLI のソースコードが公開されていない (※) ので仕様なのかバグなのかわかりませんが、いずれにせよ現時点では String しか許されないようです。
ドキュメント に schedule.frequencyパラメータの Example がいくつか記載されていますが、そのパラメータ指定の結果として現実にどのようにスケジューリングされるのか説明がないので、とてもわかりづらく感じます。
(単に私が Cron形式の表記に慣れすぎているだけなのかもしれませんが。)
とりあえず以下のルールになっているようです。
start_timeフィールドの日時が基準となる。
(例:type: weeklyならば、その後の同曜日の同時刻に起動される。)- 各フィールドにある “Required?“欄は嘘っぱち。
(例:on_daysなど、不要ならば指定しなくてもべつに問題ない。)
長スパン (直近半年) のほうの定義も同様です。
こちらは 2023年10月03日の日本時間10:00:00 が初回起動日時で、毎月3日の同時刻に定期起動します。
triggers/cost_chart_6months_scheduled_trigger.ts
import { TriggerTypes } from "deno-slack-api/mod.ts";
import { Trigger } from "deno-slack-sdk/types.ts";
import CostChartWorkflow from "../workflows/cost_chart_workflow.ts";

const CostChart6monthsScheduledTrigger: Trigger<
  typeof CostChartWorkflow.definition
> = {
  type: TriggerTypes.Scheduled,
  name: "Cost chart 6-months trigger",
  description: "[Scheduled] 直近6か月間のチャートを表示する。",
  workflow: `#/workflows/${CostChartWorkflow.definition.callback_id}`,
  schedule: {
    start_time: "2023-10-03T10:00:00+09:00",
    frequency: {
      type: "monthly",
    },
  },
  inputs: {
    channel: {
      value: "<SlackチャネルID>",
    },
    scope: {
      value: "6-months",
    },
    accountIds: {
      value: [
        "<ID@アカウント1>",
        "<ID@アカウント2>",
        ...
      ].join(","),
    },
  },
};

export default CostChart6monthsScheduledTrigger;
Manifest
最後に App manifest を整えます。
icon には Slackアプリのアイコンとして使用する画像ファイルのパスを指定します。
types、functions、workflows には、作成した Custom type、Function、Workflow を列挙します。
outgoingDomains は通信する外部ドメインを列挙します。
(Deno の --allow-netオプション相当の設定項目です。)
以下 3つのドメインを列挙します。
| ドメイン | 用途 |
|---|---|
ce.us-east-1.amazonaws.com | AWS の Cost Explorer API |
esm.sh | 各種パッケージの取得 |
unpkg.com | svg2png-wasm用の Wasmモジュールの取得 |
なお、slack.com はデフォルトで許可されるので記載不要です。
botScopes はアプリが要求する Permission scope です。files.upload API を叩くために files:write が必要です。
manifest.ts
import { Manifest } from "deno-slack-sdk/mod.ts";
import { BuildChatMessageFunctionDefinition } from "./functions/build_chat_message_function.ts";
import { DrawChartFunctionDefinition } from "./functions/draw_chart_function.ts";
import { FetchCostDataFunctionDefinition } from "./functions/fetch_cost_data_function.ts";
import { PostChartFunctionDefinition } from "./functions/post_chart_function.ts";
import {
  CostAndUsageMetricType,
  CostAndUsageType,
} from "./types/cost_and_usage.ts";
import { FetchScopeType } from "./types/fetch_scope.ts";
import CostChartWorkflow from "./workflows/cost_chart_workflow.ts";

export default Manifest({
  name: "aws-cost",
  description: "AWS の使用料金を通知する。",
  icon: "./assets/app_icon.png",
  types: [
    CostAndUsageMetricType,
    CostAndUsageType,
    FetchScopeType,
  ],
  functions: [
    BuildChatMessageFunctionDefinition,
    DrawChartFunctionDefinition,
    FetchCostDataFunctionDefinition,
    PostChartFunctionDefinition,
  ],
  workflows: [
    CostChartWorkflow,
  ],
  outgoingDomains: [
    "ce.us-east-1.amazonaws.com",
    "esm.sh",
    "unpkg.com",
  ],
  botScopes: [
    "files:write",
  ],
});
以上でアプリの実装は完了です。
実行結果
作成したアプリを Production環境にデプロイします。
$ slack deploy
無事にデプロイできたら環境変数を登録します。
$ slack env add AWS_ACCESS_KEY_ID 'AKIA...'
$ slack env add AWS_SECRET_ACCESS_KEY 'm1/A...'
$ slack env add AWS_REGION 'ap-northeast-1'
デプロイしたアプリは目的の Slackチャネルにインストールしておきます。
仕上げに Trigger を有効化して運用開始です。
$ slack trigger create --trigger-def ./triggers/cost_chart_1week_scheduled_trigger.ts
$ slack trigger create --trigger-def ./triggers/cost_chart_6months_scheduled_trigger.ts
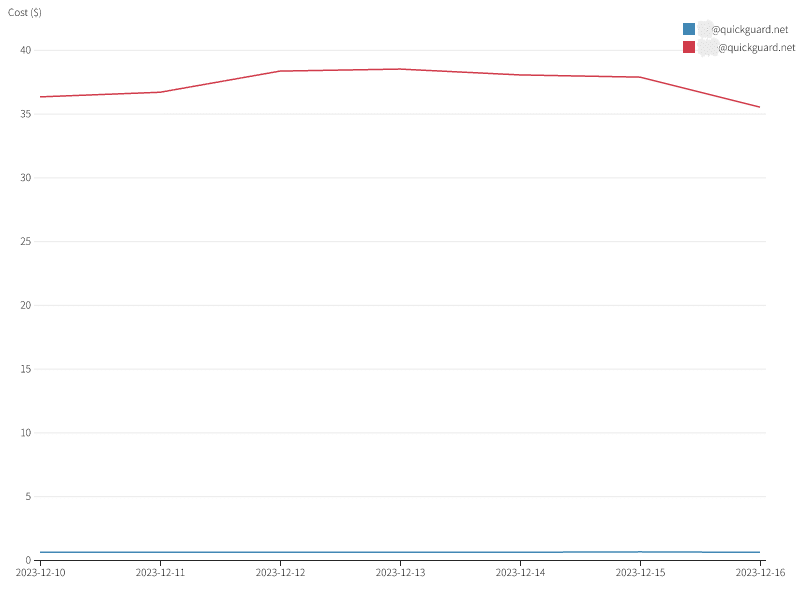
これで以下のようなメッセージが定刻に投稿されるようになります。
(チャート拡大図)
振り返り
一言で表すと、明らかな技術選定の誤り… という感じでしょうか。
なんとか目的どおりのアプリの作成には成功したものの、着手前に予感したとおり、多数の地雷を踏み抜き、そして Hacky なワークアラウンドで切り抜けました。
たしかにアプリをホスティングする環境を自前で用意しなくてよいのは明確な利点になる場合が多いですが、今回のように画像生成などの面倒な処理を含むケースでは、逆に “環境の融通の効かなさ” というデメリットになってしまいました。
このようなケースでは無理に Next generation Slack platform を採用せず、素直に従来の方式で実装し、自前の環境で動作させたほうがよさそうです。
Next generation Slack platform の採用は、基本的に 公式Sample と類似するワークフローのみに留めておいたほうが無難だと感じました。
Appendix
開発中に気になった点をいくつか。
ローカルのアイコン
$ slack runコマンドで開発中のアプリをローカルで動作させることができるのですが、その際、ボットのアイコンはデフォルトのままとなります。
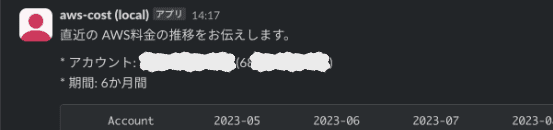
Manifest で指定した画像が設定されていないのはなんでかしら… と悶々としましたが、そういうもののようです。
デプロイしたアプリでは指定どおりの画像がアイコンになりますのでご安心ください。
タイムアウト
ローカルでの実行には無駄にきつい制約が課されており、Function は 3秒でタイムアウト してしまいます。
(Production環境では 15秒です。)
When building workflows using functions, note that there is a 15 second timeout for a deployed function and a 3 second timeout for a locally-run function. If the function has not finished running within its respective time limit, you will see an error in your log.
タイムアウトに引っかかると、event_dispatch_failed というよくわからないエラーがログに記録されます。
$ slack run
...
Connected, awaiting events
2023-12-21 16:28:08 [info] [Wf065H4AUH0D] (Trace=Tr06B4L344SX) Shortcut trigger successfully started execution of function 'Cost chart workflow'
2023-12-21 16:28:08 [info] [Fn0655G0T2LF] (Trace=Tr06B4L344SX) Function 'Cost chart workflow' (workflow function) started
2023-12-21 16:28:08 [info] [Wf065H4AUH0D] (Trace=Tr06B4L344SX) Workflow 'Cost chart workflow' started
2023-12-21 16:28:08 [info] [Wf065H4AUH0D] (Trace=Tr06B4L344SX) Workflow step 1 of 4 started
2023-12-21 16:28:09 [info] [Fn065L2AATGS] (Trace=Tr06B4L344SX) Function 'Fetch cost data function' (app function) started
2023-12-21 16:28:12 [error] [Fn065L2AATGS] (Trace=Tr06B4L344SX) Function 'Fetch cost data function' (app function) failed
        event_dispatch_failed
2023-12-21 16:28:13 [info] [Fn065L2AATGS] (Trace=Tr06B4L344SX) Function 'Fetch cost data function' (app function) completed
2023-12-21 16:28:13 [info] [Wf065H4AUH0D] (Trace=Tr06B4L344SX) Workflow step 'Fetch cost data function' completed
2023-12-21 16:28:14 [info] [Wf065H4AUH0D] (Trace=Tr06B4L344SX) Workflow step 2 of 4 started
2023-12-21 16:28:14 [info] [Fn065YLX301X] (Trace=Tr06B4L344SX) Function 'Draw chart function' (app function) started
2023-12-21 16:28:17 [info] [Fn065YLX301X] (Trace=Tr06B4L344SX) Function 'Draw chart function' (app function) completed
2023-12-21 16:28:17 [info] [Wf065H4AUH0D] (Trace=Tr06B4L344SX) Workflow step 'Draw chart function' completed
...
なお、エラー・メッセージは吐かれるものの、処理が途中で打ち切られることなく後続の Functon に繋がって、Workflow は最後まで正常に実行されているようです。
この Issue でタイムアウト値の引き上げなどが議論されていますが、まだ解決していないようです。
まとめ
不要なリソースの消し忘れに気づくために、AWS の利用料金をチャート化して Slack へ定期的に投稿する仕組みを構築しました。
プラットフォームには Next generation Slack platform を採用しましたが、改めて振り返ってみると技術選定の誤りを強く感じるところです。
(面倒なので別プラットフォームで作り直したりはしませんが。)
これで本当にリソースの放置が減るかどうか、今しばらく経過を観察してから判断したいと思います。
今後ともよろしくお願い申し上げます。
当記事の図表には Font Awesome のアイコンを使用しています。